The AREA command
The AREA command is a basic tool in AutoCAD that allows you to find the values of the areas and perimeters of specified areas.
There are two ways to find areas and perimeters in AutoCAD using the AREA command:
- By specifying points in the drawing • In this case, you must manually specify in sequence the points of the conditional polygon (shape) whose area you want to calculate. Moreover, a shape created in this way can generally be defined without reference to any objects in the drawing. In other words, the area of the shape can be determined at an arbitrary location in the drawing.
- By selecting a previously created object • POLYLINE, REGION, SPLINE or CIRCLE can be selected as an object. Moreover, the polyline area can be calculated both for closed and open objects. If an open polyline is selected, then the area of such a polyline will also be calculated. In this case, the area will be found for an equivalent closed polyline in which the first and last points are connected by a straight line. The same area calculation scenario applies to open splines.
The AREA command options
After entering the command, the following options are available (see Fig. 1):
- Specify first corner point (default option).
- Object.
- Add area.
- Subtract area.

The AREA command options in the AutoCAD command line
Let's consider each of the options in more detail with examples of use.
Specify first corner point option
This option is active by default. When specifying a point of the first corner, the area calculation mode is activated by specifying points in the drawing. After specifying the first point, the user is prompted to sequentially specify all points of the measured area. Neighboring specified points will be connected by default with linear segments. The entire perimeter of the area formed at the construction stage is like a temporary polyline, and the area bounded by this polyline is highlighted in green. In this case, the first specified point and the current position of the cursor crosshairs are also interconnected by a flexible segment that changes its position and length depending on the position of the cursor.
To complete the creation of the shape, press the ENTER key. After that, the calculation of the values of the area and perimeter of the defined shape will be carried out. The result of the calculation will be displayed on the command line and in the tooltip. When defining the area, it is important to remember that all points specified in this way must be located in the XY plane of the current user coordinate system (UCS).
Linear and arc segments
In the process of forming the perimeter of a shape using the method of specifying points, it may be necessary to specify an arc fillet instead of a linear segment. To add an arc segment instead of a linear one, use the Arc suboption.
To return to the ability to set linear segments, select the Linear suboption (see Animation 1):
An example of creating a shape with the AREA command using linear and arc segments
Object option
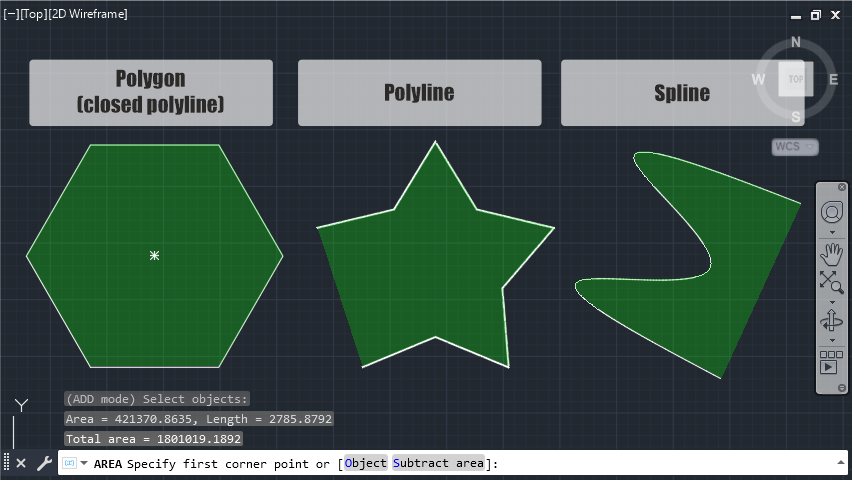
When this option is activated, the user is given the opportunity to find the value of the area and perimeter of the selected object. As objects, as mentioned above, various closed and open objects with area can be selected. These include circles, polylines (including polygons formed by polylines), splines and regions (see Fig. 2):

An example of the area measurement for POLYGON, POLYLINE and SPLINE objects
Objects such as LINE or ARC do not have the area property, so using the AREA command on these objects will not work.
Add area option
Enables the area and perimeter measurement mode with the ability to sequentially add several areas (shapes) in the drawing. Thus, the measurement result will be the sum of the values of the areas of the indicated shapes. In this mode, it is also possible to define areas both in the form of objects and in the form of a sequence of points (polygons).
An example of finding the total value of the area of several shapes
Subtract area option
The Subtract area option activates an additional mode that can be used in conjunction with the add area mode. In this mode, the specified area is subtracted from the sum of previously added ones.
The combination of the Add area and Subtract area options is convenient to use when calculating the area of a shape containing islands. The result of such a combination will be the value of the area of the shape minus the area of the islands.
An example of creating a shape with the AREA command using the Add area and Subtract area options
For other methods of measuring areas in AutoCAD, see How to find area in AutoCAD article.


